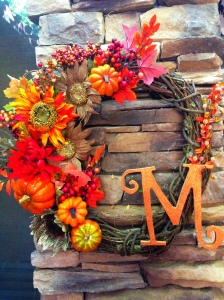
Can you believe it’s already November?! I’m already working on menu planning for Thanksgiving… where did the time go?! With Thanksgiving right around the corner, that also means it’s time for lovely fall decorations. I love all the wonderful harvest decor, the colors are so beautiful and warm, I think this time of year feels very “homey” and cozy. I have a wreath up at my front door everyday of the year and change it with the season and holiday. I decided to make my own fall wreath, and I am so happy with the way it turned out, and it was so easy! Here’s how you can make your own homemade fall wreath.
Materials
plain wood wreath
wood letter for your last name
orange glitter spray paint
large variety of fall decor items: small pumpkins, leaves, flowers, berries, etc.
glue gun
Instructions
I’m telling you all this wreath is so easy to make! I got all of the materials at Hobby Lobby, if you don’t have that store near you I’m sure any craft store will have everything you need. The first thing you want to do is spray paint your wood letter so it has time to dry. Follow the directions on the spray paint can. All you have to do now is plan out how you want to arrange the items you bought on your wreath. You definitely want to plan it out before you glue it down. Once you’ve got everything arranged, glue your pieces down and let it dry. Once your letter is dry glue that on, and that’s it! I told you, so simple! The great part is you can really do anything you’d like with it, and really no matter what you do it’s going to look great. Be sure to use enough glue to keep the pieces secure, and try to keep the glue from being visible. This is the only challenging part as I found some of my flowers were a little difficult to attach because they had wire stems. You could always cut anything in the way off with wire cutters to make attachment easy.
And of course, and most of all, have fun! Happy fall decorating!

